Oracle EBS Inventory : Define Locators, Organization & SubInventories
Defining Locators
Responsibility: Inventory, Vision Operations USA
Setting Up Stock Locators
1. (N) Setup > Organizations > Stock Locators.
2. Click New.
3. Enter a new Row Rack and Bin.
Note: Locators must be unique across an organization.
4. Enter a Description.
5. Enter the Subinventory.
6. (M) File > Save.
7. (M) File > Close Form.
Tasks
Defining Stock Locators
1. Define some storage locators for your ##FGI subinventory and your ##Main subinventory. For this exercise use the following convention:
- Row: (your team #) ## ##
- Rack: 01 01
- Bin: 01 02
-
Subinventory: ##FGI
- Row: ## ##
- Rack: 02 02
- Bin: 01 02
- Subinventory: ##Main
Solution – Defining Locators
Defining Stock Locators
1. Navigate to the Stock Locators window.
- (N) Setup > Organizations > Stock Locators
- (B) New
2. Click the Locator field to enter the following new locator information:
- Note: Click the Locator field to display the Stock Locators sub-window. Enter the Row, Rack, and Bin information, then click OK to return to the main Stock Locators window.
|
Field Name |
Value (Line 1) |
Value (Line 2) |
Value (Line 3) |
Value (Line 4) |
|
Row |
(your team #) ## |
(your team #) ## |
(your team #) ## |
(your team #) ## |
|
Rack |
1 |
1 |
2 |
2 |
|
Bin |
01 |
02 |
01 |
02 |
|
Description |
Anything |
Anything |
Anything |
Anything |
|
Status |
Active |
Active: Not Available for Netting, ATP and Reservations |
Active |
Active: Available for ATP and Reservations |
|
Subinventory |
##FGI |
##FGI |
##Main |
##Main |
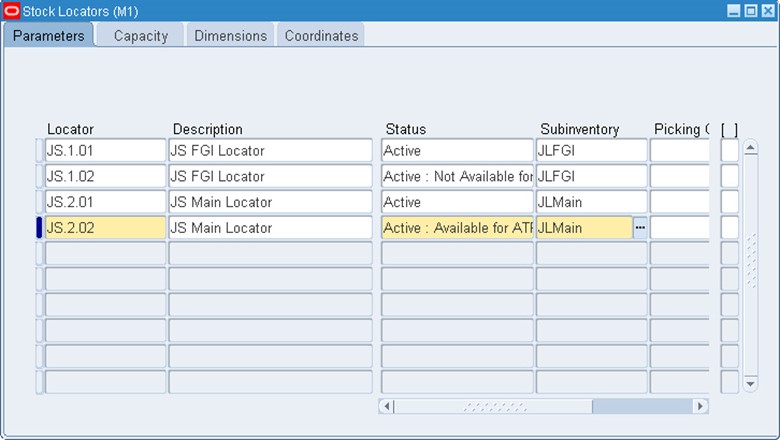
3. Select (M) File > Save
4. Select (M) File > Close
Guided Demonstration – Setting Up Organizations
Responsibility: Inventory, Vision Operations USA
1. Navigate to the Organizations window.
- (N) > Setup > Organizations > Organizations.
2. (B) New in Find window
3. Set up a new organization using the following information:
- Name: M12 Orlando MFG
- Type: Plant
- Location: M12 Orlando MFG
4. Save your work.
5. In the Organization Classifications alternative region, select the following information:
- Name: Inventory Organization
- Enabled: Selected
6. Save your work.
Define Accounting Information
7. (B) Others > Accounting Information.
8. Enter the following accounting information:
- Primary Ledger: Vision Operations
- Legal Entity: Vision Operations
- Operating Unit: Vision Operations
9. Save your work.
Define Inventory Parameters
10. (B) Others > Inventory Information > (T) Inventory Parameters
11. Enter the following inventory parameters:
- Organization Code: M12
- Item Master Organization: Vision Operations
- Calendar: Vision01
- Demand Class: Blank
- Move Order Timeout Period: 60 Days
- Mover Order Timeout Action: Approve automatically
- Locator Control: Determined at Subinventory Level
- Allow Negative Balances: Selected
- Auto Delete Allocations at Move Order Cancel: Selected
12. (T) Costing Information
13. Enter the following costing parameters:
- Costing Method: Standard
- Transfer to GL: Yes
- Reverse Encumbrance: No
- Project Cost Collect Enabled: No
- Defer Logical Transactions: No
- Cost Cutoff Date: Blank
- Default Material Sub-Element: Blank
- Material Overhead Sub-Element: Blank
14. Enter the following valuation accounts:
|
Account Type |
Account |
|
Material |
01-000-1410-0000-000 |
|
Outside Processing |
01-000-1450-0000-000 |
|
Material Overhead |
01-000-1420-0000-000 |
|
Overhead |
01-000-1430-0000-000 |
|
Resource |
01-000-1440-0000-000 |
|
Expense |
01-520-7530-0000-000 |
15. (T) Other Accounts
16. Enter the following other account information:
|
Account Type |
Account |
|
Purchase Price Variance |
01-520-5210-0000-000 |
|
Invoice Price Variance |
01-520-5220-0000-000 |
|
Inventory AP Accrual |
01-000-2220-0000-000 |
|
Sales |
01-520-4110-0000-000 |
|
Cost of Goods Sold Account |
01-450-5110-0000-000 |
|
Deferred COGS Account |
01-450-5110-0000-000 |
17. (T) Revision, Lot, Serial And LPN
18. Enter A in the Starting Revision field.
19. Enter the following Lot Control parameters:
- Uniqueness: Across Items
- Generation: At Item Level
- Total Length: 30
- Auto Create Lot UOM Conversion: Blank
- Allow Different Lot Status: With exception
20. Enter the following Serial Control parameters:
- Uniqueness: Within organization
- Generation: At Item level
- Prefix SER
- Starting Serial Number: 0000000001
21. (T) ATP, Pick, Item-Sourcing
22. Enter the following information:
- ATP Defaults Rule: Total ATP, No DC (select second)
- Picking Defaults: Rule: Default Picking Rule PR1
- Subinventory Order: Blank
- Locator Order: Blank
- Pick Confirmation Required: Blank
- Over Picking for Manufacturing: Blank
- Over Picking for Transfer Orders: Selected
- Enable Rules Override for Lot-Level Res.: Selected
- Item Sourcing Detail: Type: Supplier
- Item Sourcing Detail: Organization: Blank
- Item Sourcing Detail: Subinventory: Blank
23. (T) Inter-org Information
24. Enter the following information:
- Inter-organization Transfer Charge: Predefined percent
- Predefined Percent: 10%
- Transfer Credit: 01-520-5290-0000-000
- Purchase Price Variance: 01-520-5210-0000-000
- Receivable: 01-000-1810-0000-000
- Payable: 01-000-2370-0000-000
- Intransit Inventory 01-000-1460-0000-000
25. (M) File > Close Form
Define Receiving Information
26. (B) Others > Receiving Information
27. Enter the following Receiving Information:
- Enforce Ship-To: None
- ASN Control Action: None
- Receipt Days Early and Late: 5
- Receipt Days Exceed-Action Warning
- Over Receipt Tolerance (%) 5%
- Over Receipt Action Warning
- RMA Receipt Routing: Standard Receipt
- Receipt Routing: Standard Receipt
- Allow Substitute Receipts: Selected
- Allow Unordered Receipts: Selected
- Allow Express Transactions: Selected
- Allow Cascade Transactions: Selected
- Validate Serial Numbers on RMA Receipts: Selected
- Receipt Number Generation: Automatic
- Receipt Number Type: Alphanumeric
- Next Receipt Number: 1
- Validate Lots on RMA Receipts: Restricted
- Receiving Inventory Account: 01-000-1410-0000-000
- Clearing Account: 01-000-1410-0000-000
28. (B) Save
29. Click Close Window.
30. Save your work.
31. Close the Organizations window.
Link the Location to the Inventory Organization
32. Navigate to the Location window.
- (N) Setup > Organizations > Locations
33. Find M12 Orlando.
- (M) > View > Query By Example > Enter
34. Enter %M12% in the Name field.
- (M) > View > Query By Example > Run
35. (T) Other Details
36. Enter the following information:
- Inventory Organization: M12-M12 Orlando MFG
37. Save your work and close the window.
Defining Subinventories
Responsibility = Inventory, Vision Operations USA
1. (N) Setup > Organizations > Subinventories
Note: Verify that you are in organization M1 Seattle Manufacturing.
2. (M) File > New
3. Enter the following subinventory information:
- Name: Raw
- Description: Raw Materials
- Locator Control: Item Level
4. (B) Open
5. Select Receiving as the subinventory Type.
Instructor Note: Explain to the students the difference between storage and receiving subinventory types.
6. (M) File > Save
7. (M) File > Close Form
Verifying Subinventories
8. (N) Change Organization
9. Select M2 Boston Manufacturing.
10. (N) Setup > Organizations > Subinventories
11. (M) View > Find
12. Enter Raw in the Find Field.
13. (B) OK
14. Note that subinventory Raw is not available in M2.
15. (M) File > Close Form
Creating Subinventories
In this practice, you will learn how to create two subinventories.
Tasks
If necessary, change your Organization to Seattle (M1).
1. Create the following four subinventories for your team:
- Finished goods (FGI) stock subinventory
- Main Stores (MAIN) subinventory
- Raw Materials (RM) subinventory
- Low Value (LV) items subinventory. Your Low Value subinventory must be a non-tracked subinventory.
Use the following naming convention (##FGI) to differentiate your team from other teams. Replace the pound signs (##) with your team number.
2. After completing the practice, answer the following questions.
- In which organization are your new subinventories?
- Determine if ##FGI exists in M2- Boston Manufacturing and why.
Solution – Creating Subinventories
Responsibility: Inventory, Vision Operations USA
1. Change Organization to M1 Seattle Manufacturing.
- (N) Change Organization
2. Choose M1 Seattle Manufacturing.
3. (B) OK
4. Navigate to the Subinventories window.
- (N) Setup > Organizations > Subinventories
5. (B) New
6. Enter the following information:
- Name: ##FGI
- Description: Finished Goods Inventory
- Status: Active
- Type: Storage
- Locator Control: Item level
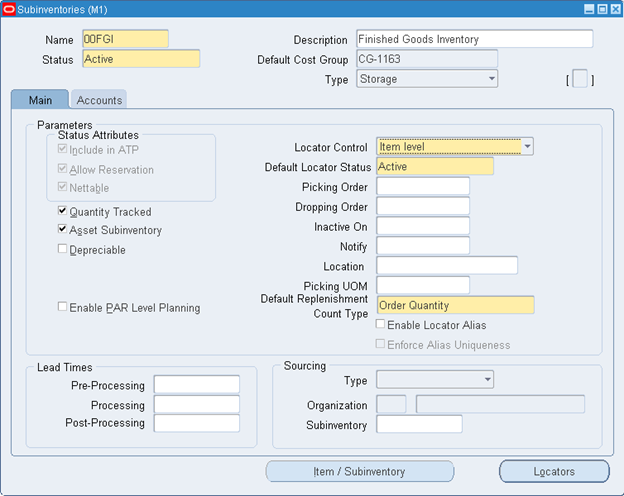
7. (B) Save
8. (M) File > New
9. Enter the following information:
- Name: ##Main
- Description: Main Stores
- Type: Storage
- Status: Active
- Locator Control: Dynamic Entry
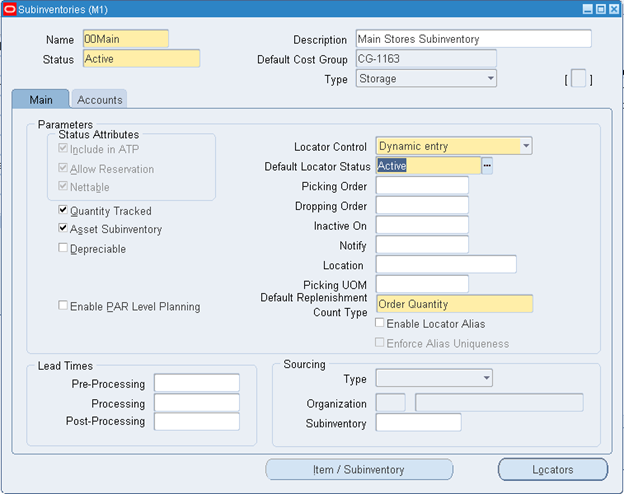
10. (M) File > Save
11. (M) File > New
12. Enter the following information:
- Name: ##RM
- Description: Raw Materials
- Status: Active: Not Available for Netting, ATP and Reservations
- Type: Storage
- Locator Control: None
- Quantity Tracked: Deselected
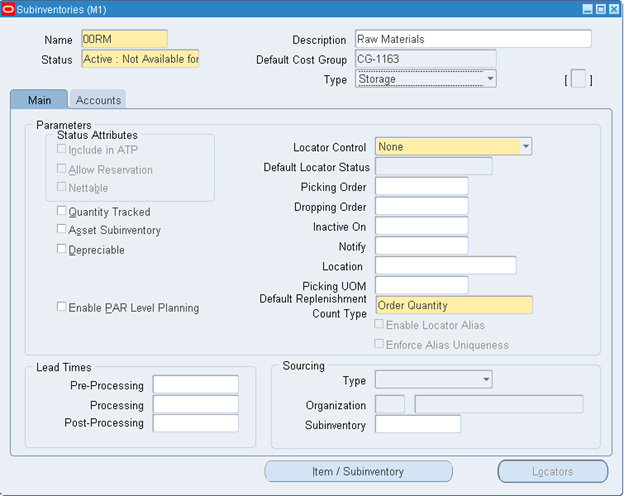
13. (B) Save
14. (M) File > New
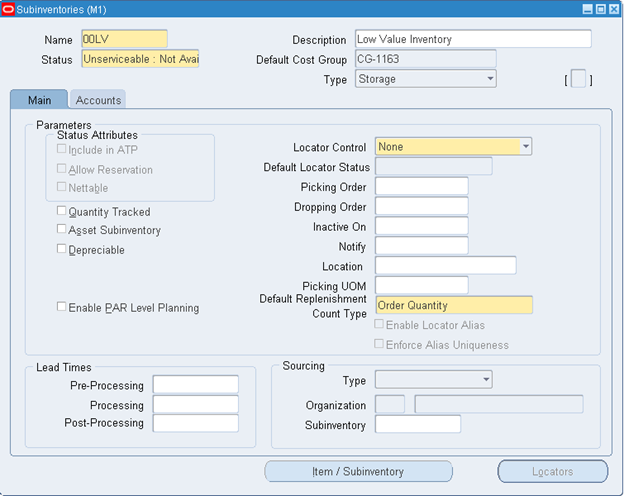
15. Enter the following information:
- Name: ##LV
- Description: Low Value Inventory
- Status: Unserviceable: Not Available for Netting, ATP and Reservations
- Type: Storage
- Locator Control: None
- Quantity Tracked: Deselected
16. (B) Save
17. (M) File > Close Form
18. In which organization are your new subinventories? M1 Seattle Manufacturing
Verifying Subinventories
19. Does a subinventory called ##FGI exist in M2 Boston Manufacturing? No, you created your subinventories in M1 Seattle Manufacturing.
20. (N) Change Organization
- Select M2 Boston Manufacturing.
21. (N) Setup > Organizations > Subinventories
22. (M) View > Find
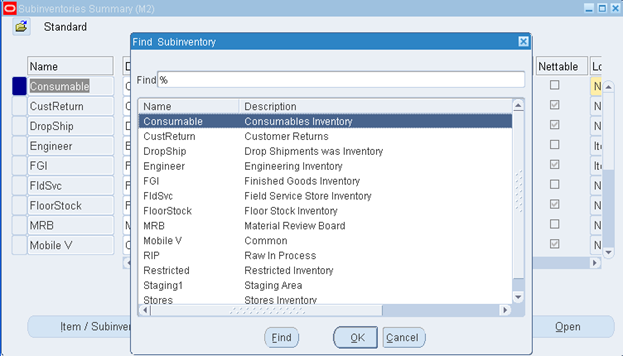
23. (M) File > Close Form

